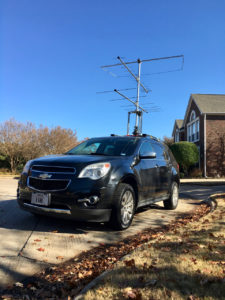
 My overall goal is to greatly ease my set up burden at each grid square. In the 2018 ARRL September VHF contest, I was really beat by the time I got to grid stop #7 late on Sunday. Plus, it was taking at least 30 minutes at each location to set things up.
The downside of this set up is that the maximum height of my mast is 12 feet versus the 20+ feet of the push-up mast. Even so, I’m hopeful that I’ll be able to add not only to my operating time but also to the number of grids I can activate, given the reduced set up time.
Rotator Mount
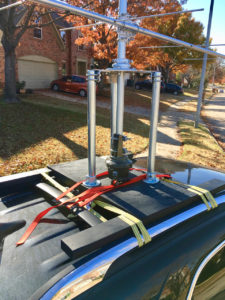
The rotator mount has been in the building process for a few months. The first aspect was constructing the base that is attached to the roof rack. It consists of 2×4 rails and cross members along with a plywood deck. You can find a rough drawing here: Rotator Roof Mount
 The rotator cage uses Steel-Tek pipes and flanges to essentially mimic a three-legged tower structure. On top of that is a DX Engineering DXE-AS455G tower shelf and their DXE-TB-300 thrust bearing. The mast is a six-foot fence post from Lowe’s hardware.
It then uses straps to attach the whole thing to the roof rack. I’ve tested it up to 75 to 80 mph with antennas. Of course, wind gusts from trucks going by will increase that force. All-in-all, it’s pretty sturdy. For example, I can grab the structure and haul myself up on the deck to work on the antennas.
Unfortunately, I also inadvertently tested it’s ability to withstand impact with tree branches. The mast structure was fine but the moxon on the top was ripped apart. I now realize that I need to put a note on the windshield to remind me of clearance distances, etc. This test happened because I was coming home and went my normal way, which has several low hanging trees over the street.
Antennas
For 6 meters, I’m using the Par Electronics SM-50 Stressed Moxon. It’s mounted at the top and extends over the each side of the car by a few inches. I may need to turn it sideways when traveling. I need to give that more thought. I didn’t feel that a 6m yagi would work as the elements would stretch still further past the sides of the car.
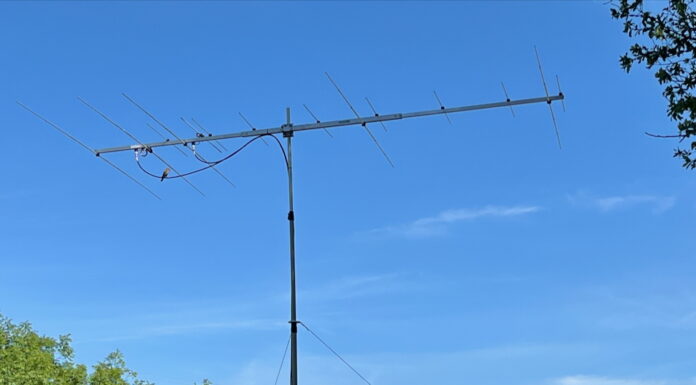
For 2 meters, I’m using Directive Systems DSE144-6RS six-element yagi. It’s 8 foot boom is just right for this set up. I added this antenna to the rover for the 2018 CQ WW VHF Contest. Sound construction and I like that the elements can be bent back into shape after contact. That’s what happened to me in the ARRL September contest in my last grid as the mast fell as I was trying to push it up during set up. That was my last grid and was I ever tired.
Directive Systems 432 RS Yagi
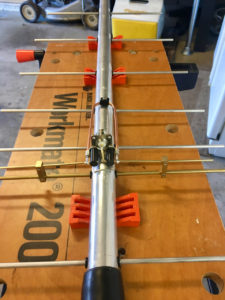
 For 70 centimeters, I’ve added Directive Systems DSEFO432-15RS yagi. It, too, has an eight foot boom along with 15 elements. I will note that I purchased the kit version instead of the assembled version. In retrospect, I recommend paying just a bit more for the assembled version. The kit went together fine, but I discovered that one of the element holes was missing. Shipping that section of the boom back to Terry Price for drilling went quickly and got me back on track. But buying the assembled version would have avoided all the hassle.
Terry also provided me with updated quick mounts for both the Directive Systems yagis. He drilled a hole through the both boom and mast mounts then tapped the hole in the mast mount. This allows you to secure the boom and mast mounts using a bolt through both plates. That’s just what I needed to first easily mount the antennas at home and then secure them to the mast while driving on the road.
Next Steps
Next is cabling, setting up the operating table, and fitting all the equipment into place. I still plan to only operate while stationary. So the operating position will be in the back seat. When I get the station set up inside, I’ll write another blog post.
Of course, there are a few other improvements, most of which will present themselves during the contest. One that I’ve already been investigating is adding 220 MHz. But not sure that’s worth it with transverter, amp, and setting something up with the IC-9100 to drive it all. But, even so, it remains something to keep in mind.
Hope to work you in the ARRL January VHF Contest.


Jim, have you had any more experience with the 6 meter moxon at highway speeds on your rover rig? I’m looking for some roving gain and this looks promising. 73, David W9HQ
Hi David, I ran in the January 2019 VHF Contest and this past weekend in the June 2019 VHF Contest. The moxon held up well. Particularly on Sunday in the June VHF Contest. I was headed north in the Texas Panhandle into a 40 mph wind and light mist traveling at 75 mph, the speed limit. I did note when operating and pointed south that the wire compressed a bit — slightly altering the geometry. But did not notice any difference in SWR or signal strength. I will post on that rover operation later today. 73 Jim K5ND
[…] In December 2018 I updated my rover antennas to a roof mounted rotator and mast system. You can find the original blog post at VHF Contest Rover — New Antenna Setup. […]
Jim, I need to thank you again for your blog site. The detailed writing and technical tips have really helped me improve my rover set up. Just yesterday, a rebuilt Ham III rotor became part of the solution and I think I might replicate your antenna system a bit.
In my case, I have a short-bed Chevy pickup, so I will palatalize the mounting base and use cargo straps to secure it. Being a teleworker during the latest COVID-19 situation, I have built ‘Cheap Yagis’ for 220 and 440 for the rover and have obtained a 4-element Cushcraft beam as well. A homebrew 6-meter Moxon tops off the mast.
For the home station, I built more ‘Cheap Yagis’ for 220 and 440. The biggest improvement came by replacing the RG-8U coax feeding my 2m Big Wheel with 1/2-inch hard line. So, maybe contesting from a residential neighborhood won’t be as difficult now.
I hope to work you in the upcoming June VHF Contest.
73,
Korey–WA5RR
Hi Korey, I’m delighted to hear that you’ve been able to use my system as a beginning model for crafting your own. I’m hopeful that all will be well for the June VHF contest and we can be out roving. I will certainly watch for you. Good luck. 73, Jim, K5ND
[…] in the CQ WW VHF Contest. It allowed me to deploy my three-element Yagi at a greater height than my roof-top rotator set up. But two set ups and two tear downs were max for this old man in the heat of a Texas […]
[…] I chose a G-450-ADC medium-duty unit by Yaesu and took heavy inspiration for its mounting from K5ND’s setup. My base and physical attachment to the car is different, but the “micro-tower” is very […]