One of the projects on my relatively long-term list has been an FSK interface. The reason it hasn’t been urgent is that the Elecraft K3 has superb AFSK circuitry that carefully controls the bandwidth of the transmitted signal. So there was no urgency to move to FSK. However, with the recent K3 firmware upgrade that also added shaping to the FSK keying signal, which no other rig currently has, it seemed like a good move. Moreover, I needed to take a break from the rigorous job search routine and have some fun building something!
I used the circuit that Fred Cady, KE7X, publishes in his book The Elecraft K3, Design, Configuration, and Operation. If you have a K3, you need this book. It goes into great detail on every feature and function of the K3 and has really helped me get it set up on RTTY. I also recommend the webpage RTTY Contesting by Don Hill, AA5AU. He goes into a similar level of detail on precisely how to get N1MM, MMTTY, 2Tone, and WriteLog set up on RTTY. It has proven invaluable in helping me work step-by-step to get things set up.
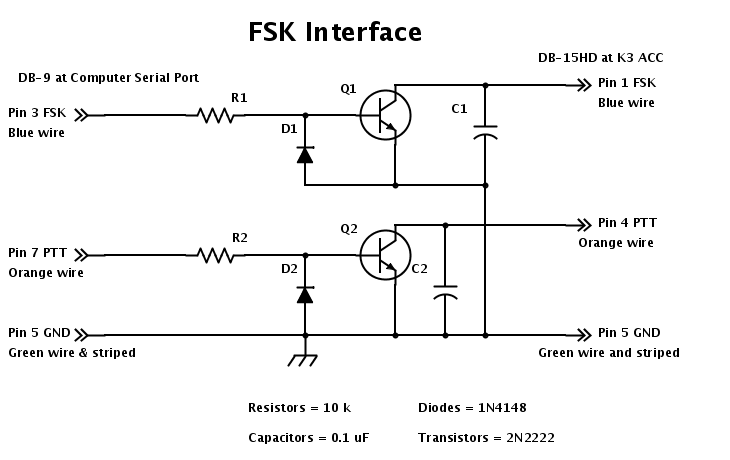
I’ve tried some documentation on the FSK interface. I used Digi-Key’s online schematic drawing tool to produce the schematic diagram shown below. I’ve also documented most of the set up changes that I implemented with the K3, N1MM, and MMTTY to get the system working for SO2V operation. You can download both the schematic and set up in PDF format at the links below.
FSK Interface Schematic
FSK Interface Settings
I’ve also taken a few photos for the slide show below. You can see that I used a perf-board to do the point-to-point wiring. While I’m told you can wire the transistor in the connector itself, my skills are not quite up to that level of miniaturization. I also set this up with connections for two serial ports to control VFO A and VFO B for SO2V operation.
We have a great local electronics store. I found all the parts there including the small plastic box, the grommets, transistors, diodes, resistors, and the CAT-5 cable. I purchased the connectors and shells online from Winford Engineering. I found that the CAT-5 cable fit very nicely in the connectors, versus the CAT-6 I used in building my radio control cables, which was just a bit big. Note that I used the solid color wires for FSK, PTT, and Ground. I also grounded all the striped wires to help with RFI.
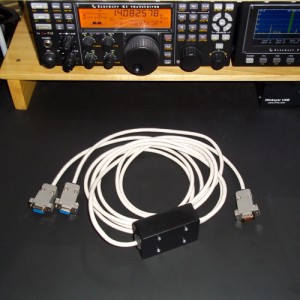
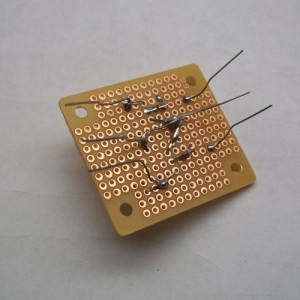
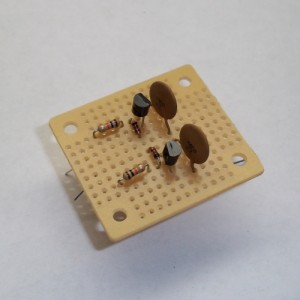
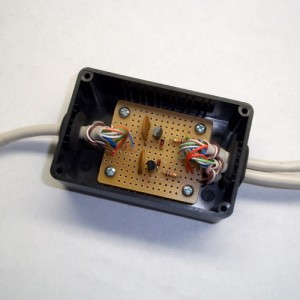
I was pleased that for the most part it worked when I first fired up the rig. There were a few conflicts in the settings of N1MM that caused a bit of concern. Reading through AA5AU’s set up instructions for N1MM, I found that I had radio control and the comm ports controlling PTT. Once I removed the radio control of PTT, it worked like a charm.
All in all, this was nice project that took the afternoon and improved my station just that little bit more. I hope you’ll be encouraged to try this interface or something similar that you’ve been thinking about.



Jim,
After working the ARRL RTTY Roundup this weekend, I learned that I need the FSK interface. Thank you for providing this information. The settings provided for the K3, N1MM, and MMTTY are very helpful. Thank you!
Scott, WA0TPN
Hi Scott,
Glad that this information could be of use. It’s a fun project, if not a little tight soldering on those pins. The K3 works great in either AFSK or FSK, but with their new firmware for great FSK I thought it was well worth making the change. Have fun.
73, Jim, K5ND
[…] FSK Interface […]
Jim,
I’ve been studying your schematic (also found in Fred’s book) and can’t figure out why you have 3 cables and connectors coming out of your interface box. Can you shed some light on that?
–Scott, W5WZ
Hi Scott,
I used the two cables to go to two different serial cards on my PC. They are essentially wired in parallel. One serial card ran the main transmit signal, the other the second transmit signal. The other cable went to the K3. This set up allowed me to run SO2V using N1MM and MMTTY. I built this 6 years ago and since have passed it on to the new owner of the K3. My memory may be faulty, but that’s what I recall of the full set up. Also check the link to the document on “FSK Interface Settings” for further background.
Good luck and 73,
Jim, K5ND
[…] FSK Interface — this post documents how to build a serial interface for the Elecraft K3 to run RTTY FSK (versus AFSK) for both the main and second receivers. […]